
Building a gaming PC as in 1993
Recently, I acquired an almost complete vintage PC: a mighty 486DX2 66 MHz!
I will restore it, complete it with some spares of mine, and install the pinnacle of PC games of the early 90s. And of course document my progression through a series of posts.
Let’s begin with a focus on the retro hardware!
(Those not interested in hardware details can jump to graphics and sound comparisons with other computers of the early 90s, such as the Amiga 500 and Atari ST).
Anatomy of a PC from 1993
The CPU: Intel 80486DX2 66Mhz
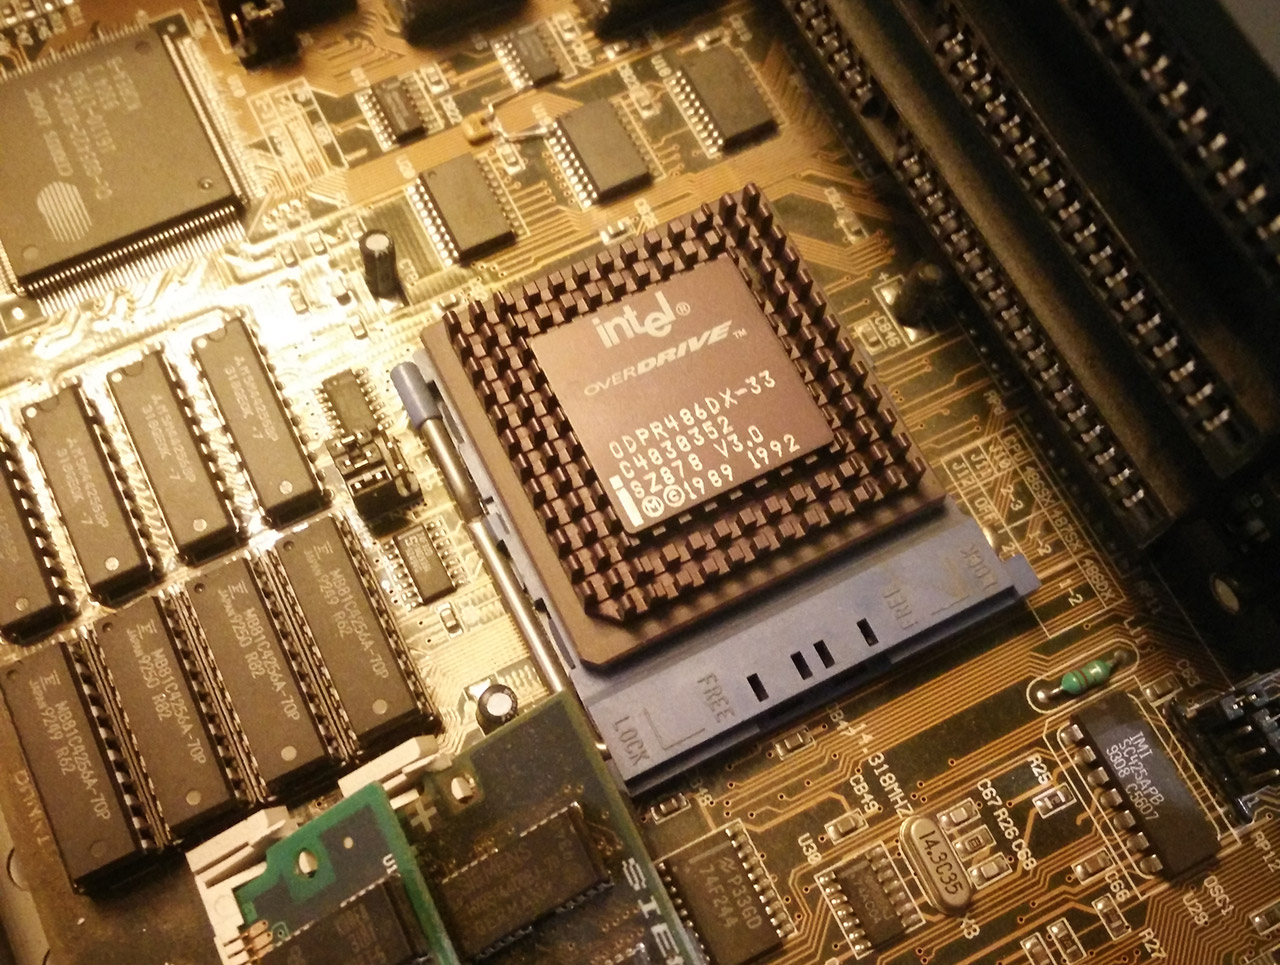 My 486DX2-66 CPU is an “Overdrive”. An upgrade for the 486DX-33.
The 486 is the fourth iteration of the Intel x86 line of processors.
The x86 lineage
-
8086 (1978). Heavily inspired by the 8080, a previous Intel 8bit processor, the 8086 is a fully fledged 16bit CPU. Its internal registers are all 16 bit wide, as well as its data bus. It can also address 1MiB of memory, which was an insane amount at that time. But as it computes the addresses on 16bit, this memory can only be accessed through 64ko “segments”. Using bigger buffers is a pain.
The 8086 has a little sibling, the 8088. It is a cut down version providing only an 8bit data bus. Incidentally, it was chosen by IBM for its Personal Computer… - 80186 (1982). It is very close to the 8086 and was mostly targeting the embedded systems market.
- 80286 (1982). Still a 16 bit CPU, it was way faster than the original 8086. Both in clock speed but also in instruction per clock. It introduced the protected mode, with the intent to allow true multitasking. Unfortunately, prior applications wrote for the “real mode” could not benefit of these new features. Nevertheless, the protected mode became important for PC gamers a few years later. Indeed, it allowed to (cumbersomely) access to more than 1 MiB of RAM. Up to 16 MiB!
-
80386 (1986). This is the point where the x86 began to become a very compelling platform! The 386 is a true 32 CPU, introducing a flat memory model (exit the dreadful memory segments!) that can address up to 4GiB of RAM! Its multitasking capabilities were way beyond those of the 286, opening the way for modern OSes to be written. Linux started as an experiment to take advantage of those features.
A low cost variant, the 386SX, features a data bus shortened to 16bit. When running 16bit legacy code, the 386SX was roughly equivalent to the 286, clock for clock.
The 80486
The 486DX can be seen as a 386 on steroids.
- Its decoding and execution units are enhanced, allowing the simplest instructions to be executed in a single cycle, twice as fast as on the 386.
- A Floating Point Unit was included into the silicon! Before the 486DX, the x86 CPUs could only handle computations on integers. Floating point computations were done in software, thus were very slow. Though you had the option to buy a separate x87 floating point coprocessor, it was expensive and reserved to business software that made extensive use of floating point numbers in their code. Moreover the FPU of the 486 is more efficient than the 387 and its communication bus with the integer ALU is also faster.
- At last, 8KiB of cache were embedded. DRAM memory was indeed way too slow to serve a CPU past 8Mhz without introducing numerous “wait states”. This internal cache (equivalent to the modern L1 cache) suffers no such drawback. The x86 processors being very sensitive to memory access time due to their lack of internal register, this internal cache brings huge performance gains! Though, it is not as efficient as the one of the 68040 (the archenemy of the 486), this cache has been carefully designed and provides a 128 bit path to read the x86 instructions. This is neat as some of those are huge.
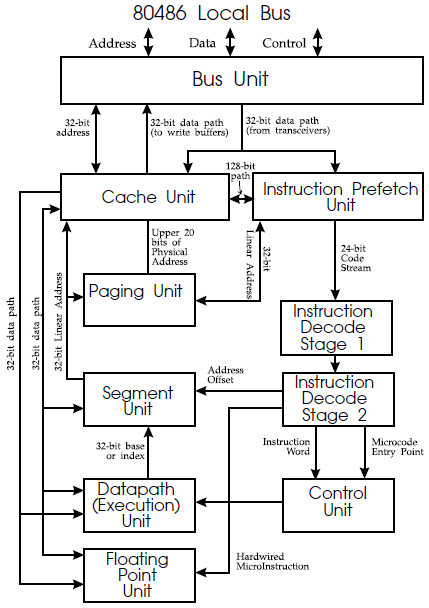 486 micro-architecture
There are many variants of the 486.
- The 486DX is the “normal” model
- The 486SX is the same as the 486DX, but without its FPU. Contrary to what some people tend to think nowadays, this had almost no impact concerning gaming. Indeed, as floating point units where a rarity among gamers, even the 3D games made no use of floating point numbers. Not even Doom.
- The 486DX2 is a 486 which run at twice the speed internally. For my 486DX2 66Mhz, this mean that the 486 itself runs at 66MHz, while its bus and motherboard are clocked at 33MHz. Running at twice the speed is only possible because of the inclusion of the L1 cache. A double clocked 386 would not have any sense as the CPU would only wait more often for the memory… Nowadays all CPU run faster than their motherboard, but at that time it was quite a novelty!
- The 486DX4 is similar to the DX2 but running at a triple frequency and doubling the L1 cache.
A benchmark
The following video displays a set of benchmarks comparing a 386DX 40 MHz to a 486SX 25Mhz running Doom.
The 486 executes the Doom benchmark 42% faster than the 386. It means that, clock for clock, the 486SX 2.3 time faster than the 386! We all miss that time when each CPU generation brought true gains on the table!
The memory
My computer is equipped of none less than 8 MiB of memory! This is FPM “Fast Paged” Memory, meaning it’s slow by today’s standards, but it was top edge at the time!
Unfortunately, there is no way to add L2 cache on my motherboard.
You read right: at that time, L2 cache memory was an external add-on! As the internal L1 cache is tiny, some amount L2 cache really helped and was common. So my computer is not very speedy, even by 1993’s standards!
The ISA bus
 I can plug the boards horizontally in the ISA slots. It was a common layout in “slim” machines.
As an ancestor to PCI Express, the ISA bus was used to connect extension boards such as graphic cards or sound cards. Running at a whopping 8 MHz, it allowed a theoretical bandwidth of 16MiB/s! This was clearly a bottleneck on late 486 machines which began to feature PCI buses in late 1993, or the stop-gap VLB bus. But my PC is ISA only, as I tend to consider that PCI was better suited to Pentiums. And also because VLB can be the source of many instabilities and headaches.
The graphic card
All PCs in 1993 were able to display at least VGA. Meaning 320×200 in 256 colors (from a palette of 262,144 colors to choose from) or 640×480 in 16 colors. Most DOS game ran in the low res mode, which was superior to what most other machines could offer.
VGA cards are also compatible with prior standards, used in older DOS games: CGA (1981) and EGA (1984).
- CGA cards could only display 4 colors, from 3 very weird pallettes, when plugged into a monitor. It was… mmmm… special!
- EGA cards could display 16 colors, but from a limited palette of 64 colors.
 The Secret of Monkey Island - CGA
 The Secret of Monkey Island - EGA
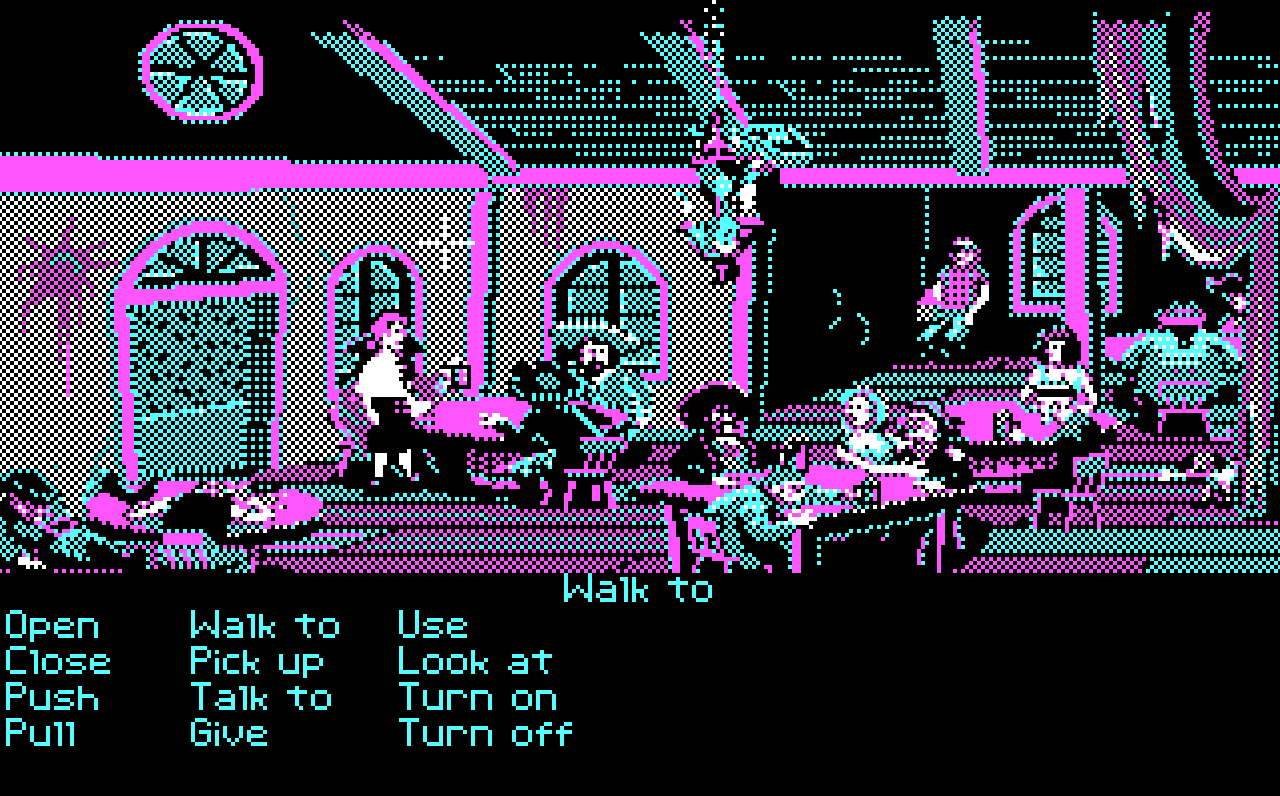
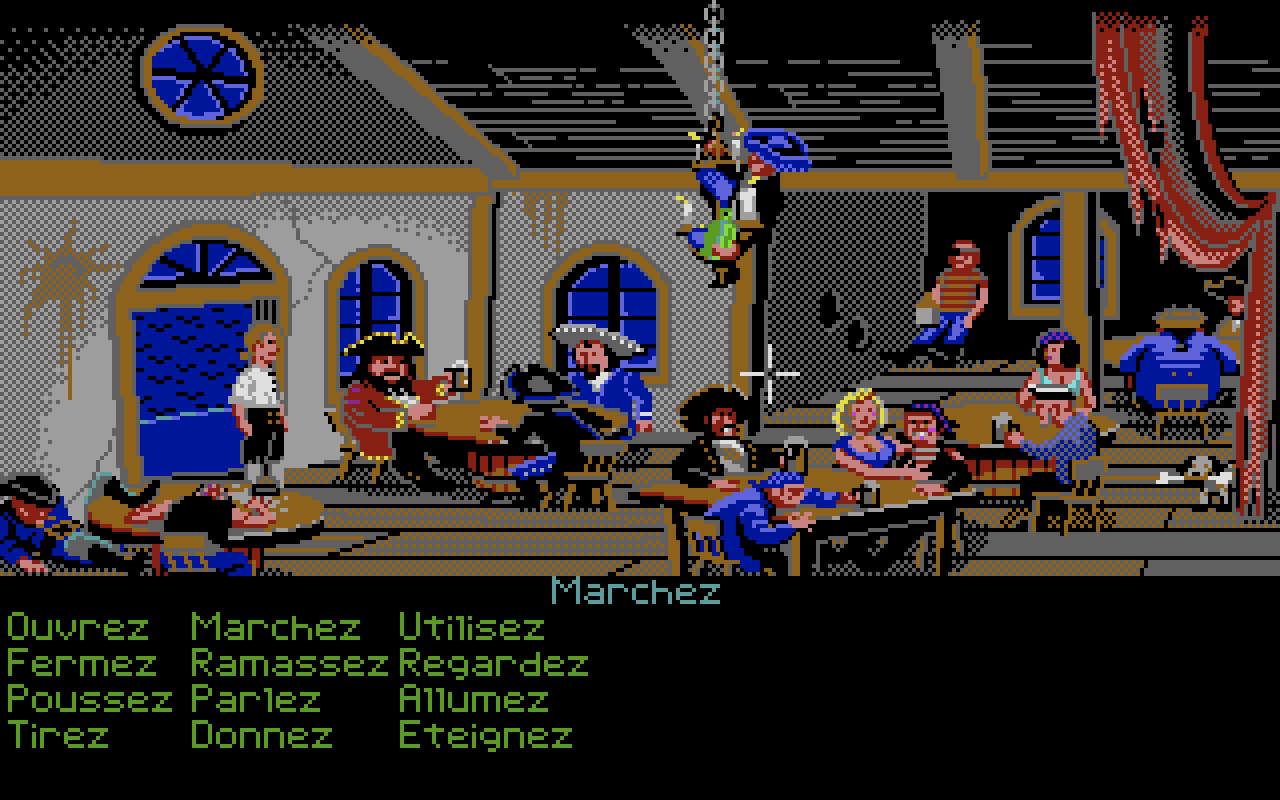
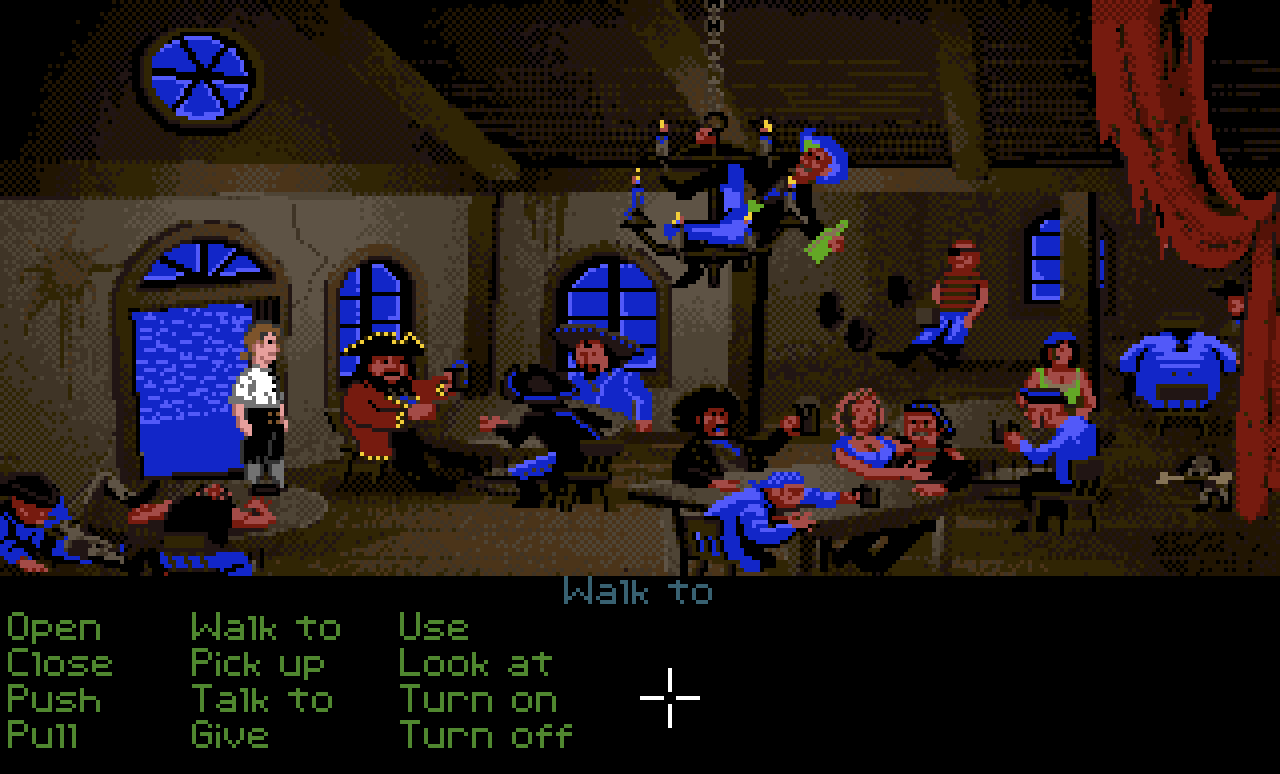
 The Secret of Monkey Island - VGA
But VGA cards, unlike the graphic circuitry of contemporary gaming machines, do not provide hardware sprite or scrolling support. All the animations have to be handled by the CPU. Also annoying: double buffering is not supported in hardware! Fortunately, 386 and 486 are fast enough to copy a screen worth of memory during a vertical refresh of the monitor, allowing to implement the functionality in software.
That explain why very powerful PCs and clever programming were required to properly run action games!
 The Secret of Monkey Island - Atari ST
 The Secret of Monkey Island – Amiga 500
Some card supported superior resolutions and colors in “Super-VGA” modes. They also provided basic 2D acceleration in order to accelerate the Windows GUI. Although having a very slow VGA card could be a bottleneck in some games like Doom (and make you lose a few FPS) games could not be accelerated by any card.
In my PC the graphic card is integrated on the motherboard, and is powered by a Cirrus Logic GD5422. This is a very respectable card, for the ISA bus. With 1MiB of dedicated memory, it can display up to 1024×768 in 256 colors.
The Sound Card
I can fit my giant Sound Blaster AWE32 in the case! I bought this card in 1994 and was so happy with it that I kept it until there was no more ISA port inside my PC (ca 2001)! Actually, it is the very last sound card I ever bought, as integrated codec were more than enough for my needs afterwards! I’m so glad to get it out of retirement!
A great backward compatibility
The AWE32 is backward compatible with:
- Adlib (1987). The first PC sound card to succeed on the market, it was based on a Yamaha OPL2 FM-Synthesizer, providing up to 11 channel of sound (mono)
- Sound Blaster (1989). Built around the same OPL2, it is fully compatible with the Adlib and adds a DMA channel to play 8 bit sampled sound (up to 23 KHz).
- Sound Blaster Pro (1991). It doubled the number of OPL2, allowing 22 voices of stereo FM synthesis. The sampled sound was still 8 bit, but could be played up to 44.1 KHz. The compatibility with the non-Pro is unfortunately incomplete.
- Sound Blaster 16 (1992). It provided the same FM capabilities as a Sound Blaster Pro, but could also playback 16 bit sampled sound in stereo and at 44.1 KHz. This brought the “CD quality” that was so important in the marketing campaigns of that time!
The Sound Blaster AWE 32 is a complete Sound Blaster 16, plus a brand new midi section. It is built around an EMU8000, which is a sample-based synthesizer. The quality is way better than what FM-Synthesizers can obtain! It can also be extended with up to 32Mib of memory to load custom samples. Although mine is equipped with 8MiB (yes, as most as the main RAM itself!), it is of no use for DOS games.
This card plus the embedded PC speaker are enough to cover almost all DOS games in existence!
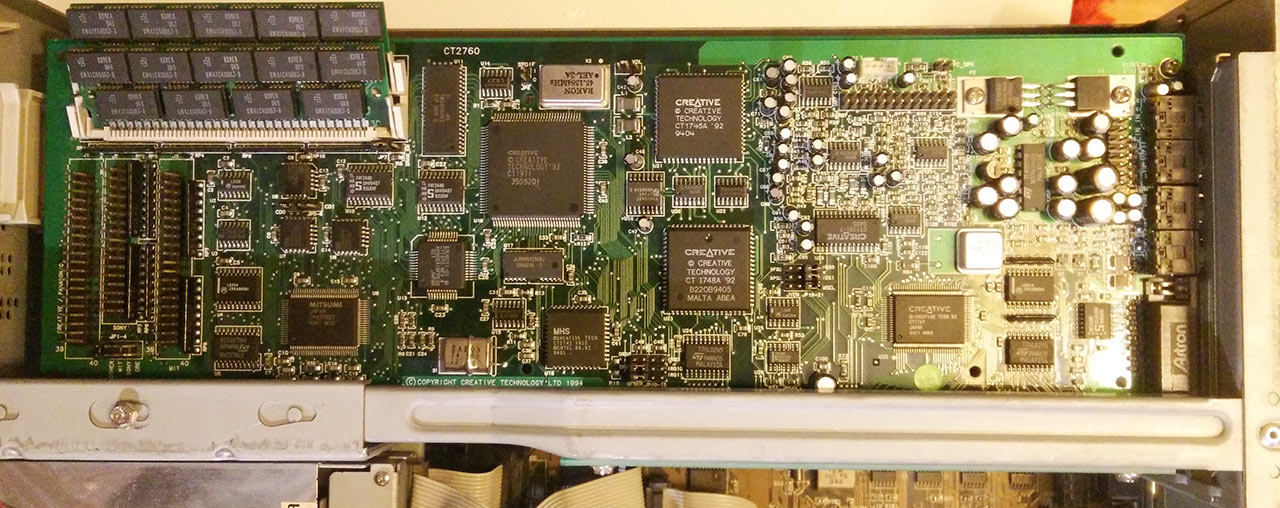 This Sound Blaster AWE is a BEAST ! (model CT2760)
Lets play some music!
To get an idea, hear the intro of “The Secret of Monkey Island” played by a PC with various sound card then an Atari ST and an Amiga 500.
-
PC Speaker:
-
Adlib:
-
Sound Blaster AWE32 in General Midi mode:
-
Atari ST:
-
Amiga 500:
As you can notice, the reputation of the Amiga concerning sound quality was well deserved! Not bad for a 1985 home machine!
Joystick
Finally, as it was the usage back then, it is the sound card that provides the Joystick connectivity. I will plug-in an early version of the Microsoft Sidewinder.
The Hard Drive
Simple: there was no hard drive supplied in my machine. So I will use a Compact Flash adapter. Compact Flash cards being true IDE devices, this is quite handy!
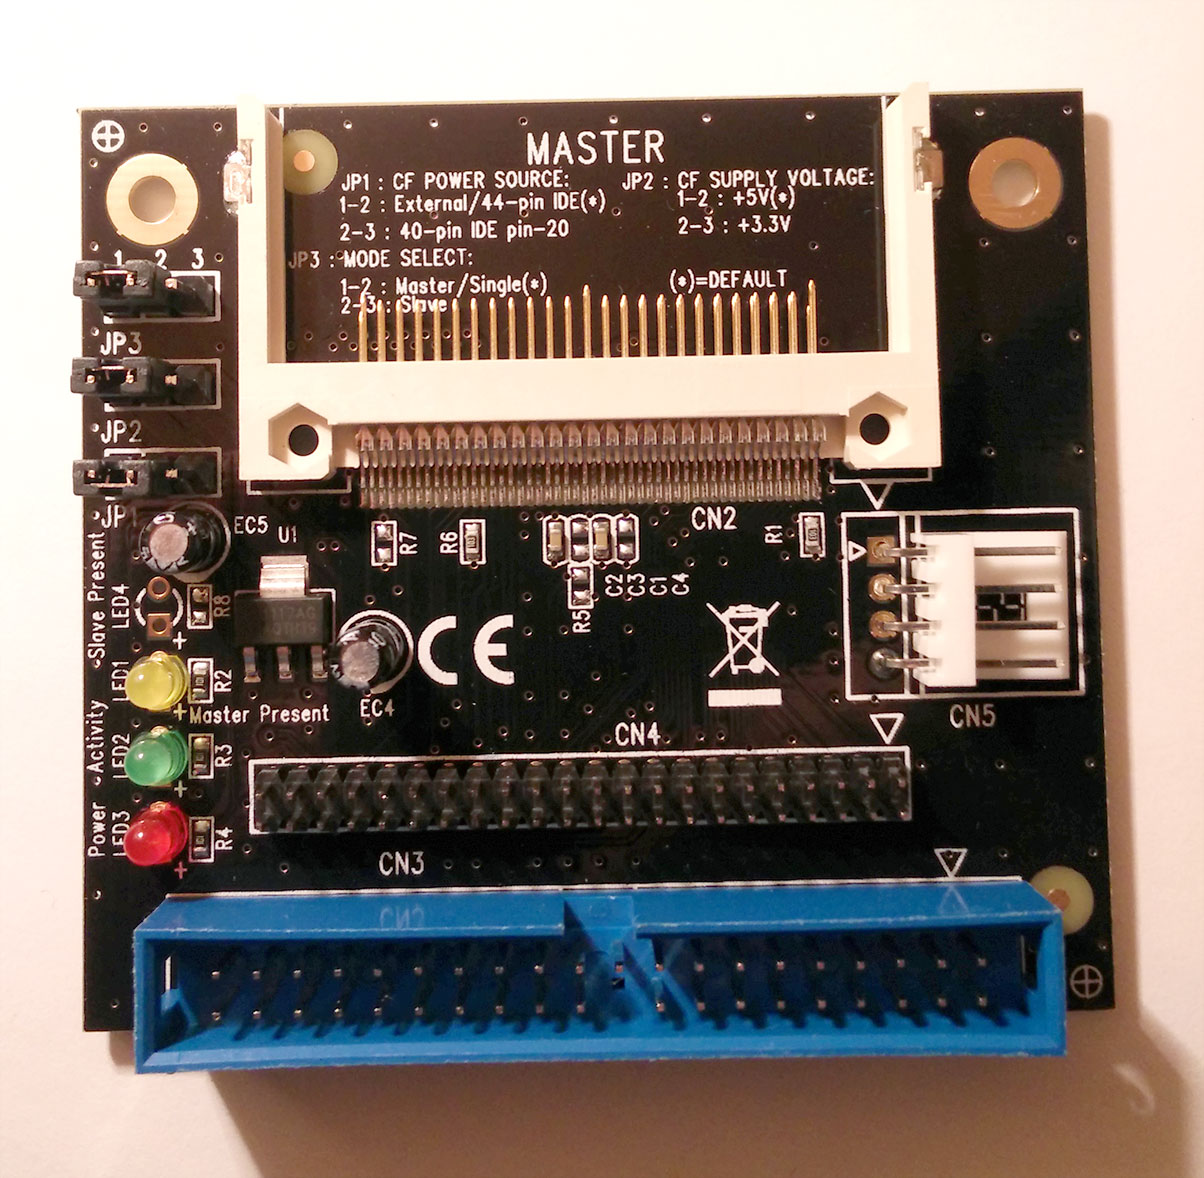 My Compact Flash to IDE adapter, a Startech IDE2CF
Unfortunately, due to BIOS limitation, I won’t be able to use the full 2GiB of my card. Indeed, I won’t be able too boot on any drive larger than 504Mib. What a waste! Fortunately, typical hard drives of the time were sized in the hundreds of MiBs. Considering that an heavy 2D DOS game ranges from 5 to 15 MiB, 504MiB should be enough.
Conclusion
This machine is a great setup to enjoy many years of PC gaming!
The CPU is powerful enough to play anything up to Doom (1994). For ancient games which may run too fast, I am able to deactivate the cache of the 486 which will slow it down around the performance of a 386DX33. And the backward compatibility of the Sound Blaster AWE32 is also a great gift.
In future post I will talk a bit about DOS, how it works and how to configure it, and about my favorite games of the era.
Stay tuned!