
Loading a modern image on an Amiga 500
Amiga computers were renowned for their “multimedia” capabilities. As early as 1985, an Amiga 1000 could display static images composed of 4096 colors or animate 32-color screens. This was way above the graphical abilities of the other personal computers on the market at that time.
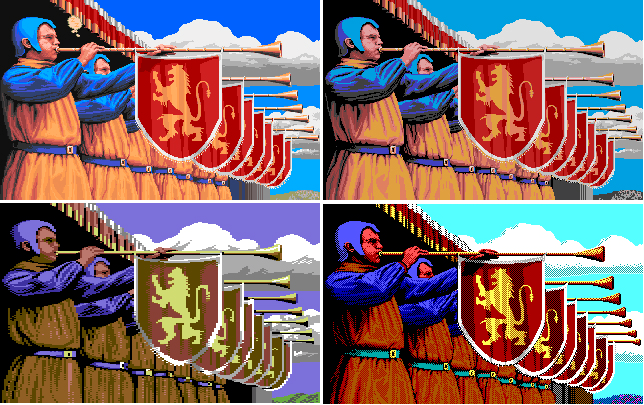 Defenders of the Crown. Amiga – Atari ST – C64 – PC MSDOS EGA
With dozen of applications such as Deluxe Paint or Lightwave taking advantage of these abilities, the reputation of the Amiga as a graphical workstation was well deserved.
Can we load a modern image on the Amiga and manipulate it with, for instance, Deluxe Paint?
The Original Chipset
The Amiga was designed around a custom chipset, now known as the OCS, which performed all the hard work delegated by the CPU. As gamers know, specialized hardware always beat software. Especially concerning the graphical tasks.
The OCS is composed of three chips.
- Agnus is the central chip. It is responsible of controlling the memory access to the so-called CHIP-RAM from the various components of the Amiga, including the CPU. It is also sports a blittter, which can quickly copy blocks of data, and the Copper, a clever independent co-processor.
- Paula hosts the audio capabilities of the Amiga: 4 independent 8-bit PCM channels that can be read at various rates. It is also responsible for all the I/O, including driving the floppy.
- Denise is the video processor, our main interest here. It can display progressive 320 or 640 pixel-wide and 200 (NTSC) / 256 (PAL) pixel-high screens. It can also display interlaced images of the same width but with a doubled vertical resolution.
 OCS diagram. All data manipulated by the chipset must reside in the shared Chip RAM (source)
Amiga image formats were devised around the capabilities of Denise. But Denise does not generates images as modern PCs do.
Thus, an Amiga cannot display a modern image as is: it will have to be converted to a suitable format beforehand.
Amiga’s graphic modes
Two kinds of graphic mode interest us.
The standard planar modes, that can display up to 32 colors in LowRes (320x256) and 16 colors in HiRes (640x256). They are well suited to display pixel arts and drawings, and they are easily manipulated and animated by the machine.
Hold and Modify (HAM) is able to display 4096 colors at once. The format is great to display photographies, but is a little bit cumbersome to manipulate and leads to some horizontal artifacts.
Planar Modes
The Amiga does not represent images in memory as modern machines do. They use a chunky representation, meaning that one or many bytes are dedicated to describe one single pixel.
For instance:
- 24-bit images: [R][G][B] [R][G][B] [R][G][B] …
- 32-bit images (+ alpha channel): [R][G][B][A] [R][G][B][A] …
- 256-color indexed: [index] [index] [index] [index]
But Amiga can only display 32 colors, indexed from a palette of 4096. Using one full byte of memory to encode one of 32 indexes would be a waste of memory. So instead of a chunky representation, the Amiga uses a planar representation.
Bitplanes are zones of memory in which one byte will contain information relevant to eight contiguous pixels. The first bit for the first pixel, the second bit to the second pixel, and so on. For each pixel, Agnus is able to fetch the corresponding bits in many biplanes to compute a color index. This color index is then passed to Denise which will look in the corresponding register which color is described. This will be the color displayed on screen for the corresponding pixel.
This is all done in hardware so there is no penalty compared to a more traditional (chunky) layout.
Example for an 8-color image, requiring 3 bitplanes.

The color index for the first pixel is 0b101, with bitplane #3 carrying the most significant bit. Denise will use the color described in register number five. Each channel (RGB) is coded by a 4-bit value. Thus the pixel can take any of the 163 (4096) colors possible.

The first pixel will be displayed with this color.
The principle is exactly the same for any 2N-color image, which will require N bitplanes. Up to 32 colors can be displayed, using 5 bitplanes.
Another special planar mode is available which makes use of a 6th bitplan: EHB (Extra-HalfBrite). The sixth bit indicates if the color in the register will be displayed with its brightness halved.
In order to be displayed in planar mode, any modern RGB image has to be dithered to the required number of colors and transformed to bitplanes. With its palette carefully chosen from the limited set of 4096 colors that can be represented by Denise.
HAM
Hold and Modify is a very peculiar mode that is unique to the Amiga and leads to some impressive results for a 1985 computer. Although limited to 320x256 images, it can display all the 4096 colors at once.
It makes use of all six bitplanes. The two bits from planes 6 and 5 select a command, and the four remaining bits a parameter for the command. A command can set a new indexed color for the pixel or modify one of the component of the previous pixel while retaining the other two.
Commands
- 0b00 – Set: Use the 4 bits of data to get a color from the 16-color palette.
- 0b01 – Modify Blue: The 4 bit of data will be the new blue component of the pixel.
- 0b10 – Modify Red: The 4 bit of data will be the new red component of the pixel.
- 0b11 – Modify Green: The 4 bit of data will be the new green component of the pixel.
HAM can display a lot of color only because each pixel’s color is picked from a limited 16-color set, or a variation of the previous one. That saves a lot of memory and bandwidth. But it also implies the apparition of horizontal artefacts, as two very different colors cannot be neighbors.
An example of what HAM can achieve:
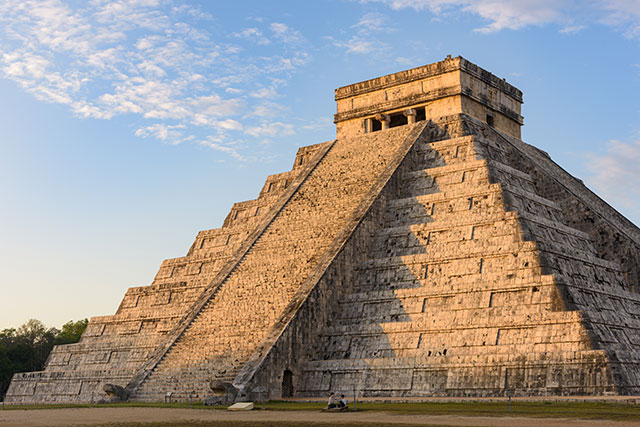 Original 24-bit image
 LowRes (320px wide) HAM conversion.
 HAM command for each pixel. Black = SET – Red / Green / Blue = MODIFY
File format
Although some common file formats of the time such as GIF, TIFF and BMP survived to this day, the dominant format on Amiga was not one of them. IFF (Interchange File Format), invented by Electronic Arts, was the norm.
It is a generic container format that can store almost anything. It is composed of “chunks” of data that bear a 4-byte ID, a 4-byte length and a binary payload that can also store nested chunks. Only a few chunks are defined by the “root” IFF standard. Derived IFF specializations can be described by documenting new chunks.
For instance, AIFF (Audio Interchange File Format) was introduced by Apple in 1988. It comes with new kinds of chunk, such as Copyright, Marker and marks the first appearance of ID3. AIFF files are still supported natively by macOs.
Images are stored in ILBM (InterLeaved BitMap). Even if it was universally used, including on PCs, it introduced chunks that are very well suited to the Amiga. BHMD (Bitmap Header) carries an info about the number of planes, CMAP describes the palette. There is even a CAMG chunk (Amiga Mode) that carries info specific to an Amiga.
In order to be easily loaded by Amiga softwares, a modern image has to be saved in IFF-ILBM.
Conversion programs
There are many program that can be used to convert a modern image such as JPEG or PNG to a suitable palletized IFF.
On Amiga
Later AGA machines (Amiga 1200 and 4000) that cohabited with 32-bits PC and Mac do not lack conversion softwares. But the choices are sparser on the Amiga 500.
If you have Workbench 3, you can install Datatypes handling modern files and open them in the provided document viewer, MultiView. It can also save them in IFF, although I don’t think it is the best way to reduce the number of colors. But chances are that a non-AGA Amiga does not come with Workbench 3 and the ROM required to run it.
The most well-known standalone program to convert images, even on Workbench 1.3, is ADP (Art Department Pro). It combines loaders, filters and savers. So it can load any supported format to a 24-bit RGB representation in memory. Filters such as scalers, sharpeners or ditherer can then be applied before saving the picture to any supported output, including palletized or HAM IFF. A program such as ADP was very appreciated at the time because, given the machine provides enough memory, there is no constrain on the format of the loaded image.
This is also the main drawback when opening these files directly on an Amiga: modern megapixels files cannot fit in the tiny memory provided. Converting the images from a modern PC is an easier path.
On PC
Photoshop can decrease the number of colors in an image and export it to IFF! Job done? Not so fast… Unfortunately you cannot easily constrain it to use only the colors available to an Amiga. So you can dither any image to 32 colors, but most of them won’t be available to the OCS chipset. Photoshop would be more suitable for AGA models.
The best tool for the job is ham_convert. This freeware can convert into many Amiga formats, including to HAM and bitplanes. It comes with many options to fine tune the result and let choose the color quantization and dithering algorithms to use. But is has one drawback: it is written in JAVA and who like JAVA nowadays? 😝
rgb2amiga
I also wrote my own conversion program which was a good exercise to learn about Amiga graphic capabilities. I called it rgb2amiga because it is what it does: convert a RGB image to an IFF tailored for the Amiga. It does less than ham_convert, but is open source software. You can download the code or the latest binary released.
The current release can only export 1 to 5-bitplane IFFs, but I intend to support EHB (64 colors) and HAM in the future.
The goal is to maximize the quality of the conversion by following these steps:
- The image is scaled down
- The colors are reduced to the 4096 that can be displayed by an Amiga OCS. Pixel by pixel, the new color is chosen by minimizing the distance between it and the original color in the YUV color-space.
- Colors are reduced to the required numbers, from 2 to 32. An optional dithering filter can be applied to smooth the transitions and reduce banding effects.
- The chunky palletized image is converted to bitplanes.
- The bitplanes are saved into an IFF / ILBM file.
Using rgb2amiga I could load the following picture on my Amiga 500 and manually colorize it using Deluxe Paint IV. 😊
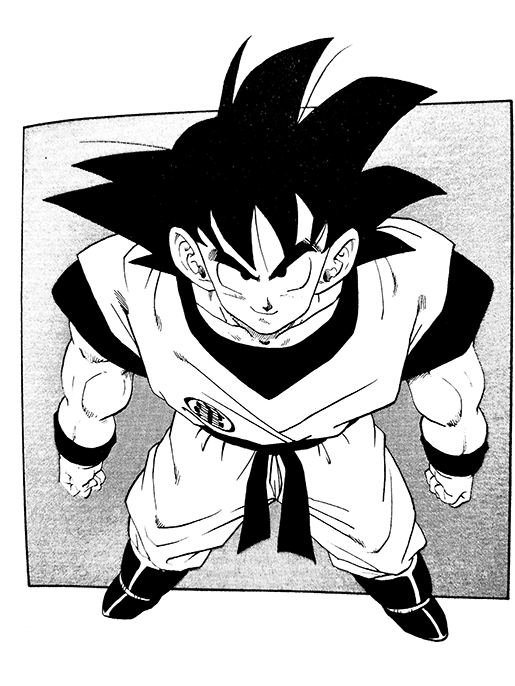 Original image from the manga
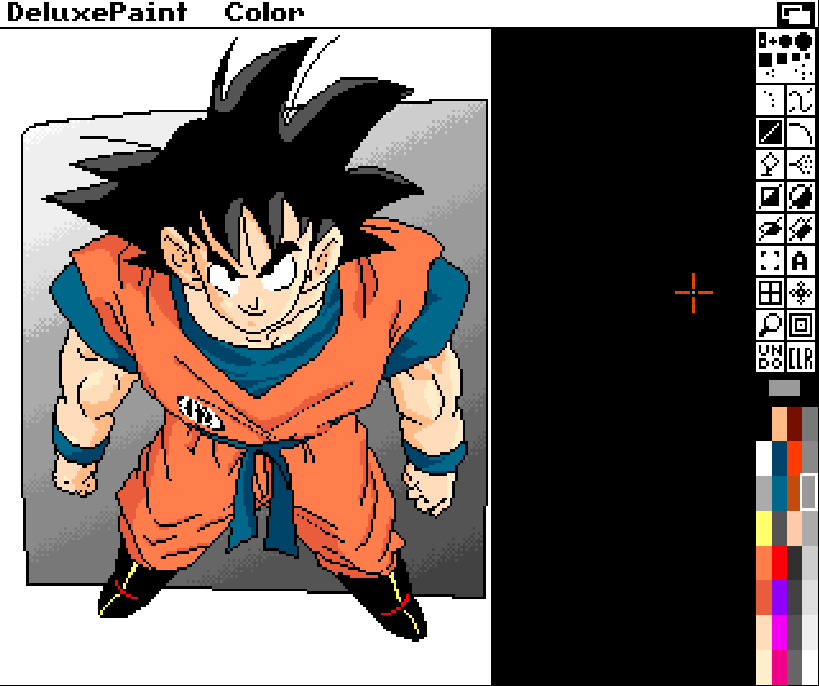 Image imported to the Amiga then colorized with Deluxe Paint IV